How to Play Dressmaker
Last updated . Dressmaker is a fan-made guide and is not affiliated with the developers.
Dressmaker is a cozy crafting game about making one dress, for one person, for one occasion. A customer walks in with a request, you design in your sketchbook, buy fabric, arrange pattern pieces, cut, sew, decorate and hand the dress over.
Nothing is timed, and there is no fail state in the usual sense. The tension comes from one rule: cutting is permanent and fabric costs coin.
The five stages, and what each costs if you get it wrong:
| Stage | What you decide | What it costs you if you get it wrong |
|---|---|---|
| Sketchbook | Silhouette, color, samples, appliqué | Time, and a design your shop cannot supply |
| Fabric | Which bolt goes on which panel | Coin spent on cloth that fights the design |
| Layout and cutting | Grain or bias, and piece placement | Permanent: a careless layout shows on the dress |
| Sewing | Seam order and alignment | A garment that fits together badly |
| Decorating | Buttons, bows, appliqué, lace | A busy dress, or trim that buries the fabric |
The first five minutes in the shop
You load into your shop, and that room is the whole game: a counter, shelves of fabric, a sewing machine, a mannequin and the sketchbook. The developers have not published a control list or a manual, so we will not invent key bindings or menu names. The shape of the loop, though, is documented:
- Go to the customer. Someone is waiting with a commission. Read the request first.
- Open the sketchbook. Every dress starts as a design in the book, not as a bolt of cloth.
- Check your stock. A design built from samples you cannot buy is a design you cannot cut.
Then walk the room, look at the bolts, and pet the kitty.
Reading a commission
Every client arrives with the two things the store text names: an important event to dress for, and their own individual taste. The developers describe a town of people "hoping to fill their wardrobes with custom-made dresses tailored specially to important events and their individual tastes."
Taste is not a hidden spreadsheet; it comes through the conversation — the occasion, the colors they react to, the words they use. That is why you talk to the customer before you design. The brief is the only free part of a commission.
What the brief turns into is a set of named targets. The official screenshots show a Requirements box listing Quality 70, Flowers 60, Cute 30, Romantic 45 for one garden-party commission, alongside a budget of 800 and roughly 3.85m of fabric required. Those attributes are the game telling you what it will judge, and the fabric shop shows the same scale as per-commission limits — Quality 0/80, Formal 0/50, Simple 0/75, Professional 0/50 — with occasional hard constraints such as using only black. Two things remain unanswered: the developers have never published the full attribute list, and they have not explained how the star rating on a customer card is worked out.
The sketchbook: designing before you cut
The sketchbook is where a commission turns into a dress. Official wording: you "design and colour your dress in your sketchbook, adding fabric samples and appliqué."
Work in that order. Silhouette first, because the shape decides your pattern pieces. Then color, which is free and reversible. Then fabric samples, so the mock-up uses cloth you actually stock. Appliqué can be planned here too.
Check your stock before you commit. The full game is deep — over 150 dress pieces, over 450 fabrics and over 350 accessories — and a silhouette decision costs nothing, while the same decision made after you have cut a length of velvet costs the bolt.
Buying and choosing fabric
The store names cotton, linen, wool, silk and velvet among over 450 fabrics. No stats are published — no drape number, no quality tier — so judge cloth the way a dressmaker does:
- Drape. Stiff cloth holds a shape; soft cloth collapses into folds. A structured silhouette in floppy cloth will not read the same.
- Print scale. A large print gets chopped up the moment you cut a bodice. Big motifs want big panels; small panels want small prints or plain cloth.
- Cost. Every bolt costs coin and no official price list exists. The bolt you buy is the bolt you have to make work.
You also "take full control over what fabric to use for each panel of your garment," so a cotton bodice with a silk skirt is a real option.
Pattern layout: grain, bias and the mannequin preview
One sentence from the official Steam store page explains the whole game: "Whether your pattern is aligned to the grain or cut on bias, how you choose to arrange and cut out your fabric is what appears on the final dress."
Grain is the direction the threads run, and a piece lined up with it behaves predictably: straight, stable, even. Bias is a diagonal cut across that weave, and the same cloth suddenly has more give and a different hang. Bias is worth choosing on purpose, and painful by accident on a piece that needed to stay square.
Placement is permanent, so use the preview. The official flow is "arrange and cut out your dress pattern, preview on a mannequin and sew together."
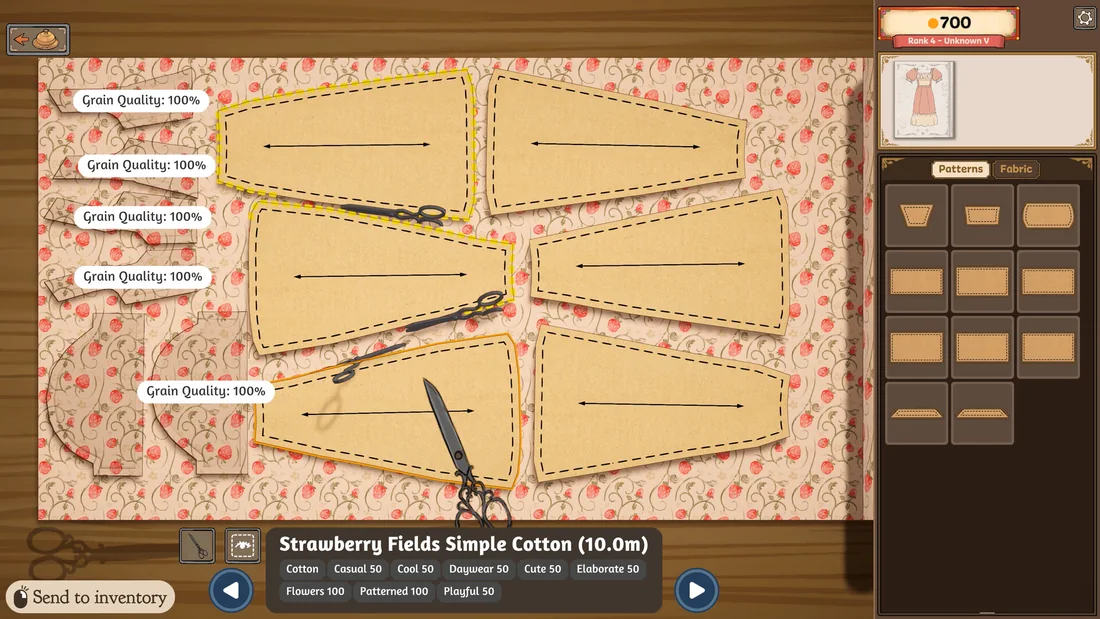
Cutting: the point of no return
Once the shears go through the cloth, that fabric is spent. No amount of careful sewing fixes a panel cut on the wrong angle, and no trim hides a print sliced through its motif.
Plan the whole layout before the first cut:
- Place every piece the design needs, not just the biggest one.
- Check print direction against each piece; a directional fabric cannot be flipped to make it fit.
- Look at what the layout leaves behind. Waste fabric is coin.
Then check the preview and cut once.
Sewing: feeding fabric through the machine
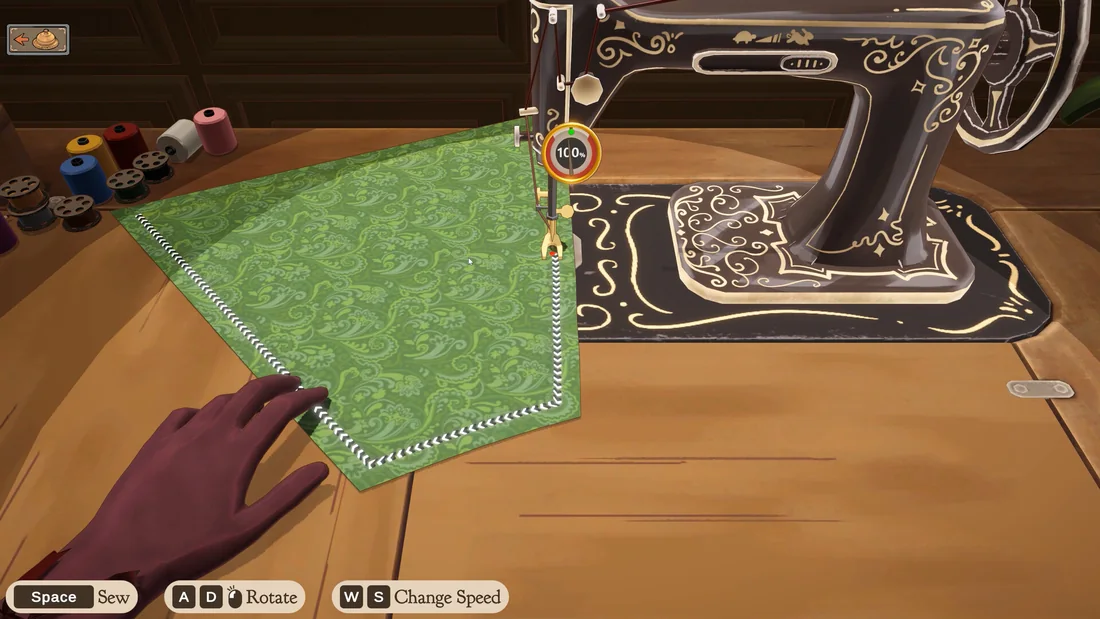
Official wording: "Feed your fabric through the sewing machine to stitch it together." The screenshot for this step is captioned "A sewing machine with infinite bobbin," so there is no spool to manage and no thread to run out. That leaves the part that matters: seam order and alignment.
No seam sequence has been published, so think it through. Structural seams have to exist before anything can line up against them, and panels have to meet edge to edge or the dress pulls.
Decorating: buttons, bows, appliqué and lace
Buttons, bows and appliqué are named on the store page, along with lace trims and other accessories, and the official promise is that you can place them "wherever you like with complete creative freedom."
Practically, decoration is the cheapest way to change a dress and the fastest way to ruin one. A busy print plus heavy lace plus a large bow is three good ideas competing for one square of cloth. If the fabric is the star, keep trim near the edges. If the silhouette is plain, decoration is where the personality comes from.
How your dress is scored
A commission is not judged on vibes. The sketchbook lists named attributes with numeric targets, the dress you hand over is measured against them, and the customer's card carries a star rating afterwards.
The clearest example in the official screenshots is a garden-party commission whose Requirements box reads Quality 70, Flowers 60, Cute 30, Romantic 45, with a budget of 800 and roughly 3.85m of fabric required. The fabric shop shows the same scale as commission limits — Quality 0/80, Formal 0/50, Simple 0/75, Professional 0/50 — and occasionally as a hard rule, such as a commission that says to use only black.
What that means in practice:
- Read the targets before you design. A brief asking for 60 Flowers wants floral fabric and floral trim. Ignoring a high target because you prefer another bolt is how a dress comes back unloved.
- Not every attribute appears in every brief. The garden-party commission names four; the shop limits show different names on other commissions. Expect the list to vary by client and occasion.
- Limits are ceilings as well as floors. A Simple 0/75 line is not an invitation to pile on decoration. It is the commission having an opinion about how much is too much.
- Hard constraints beat taste. If the brief says black only, a beautiful pink silk is a failed commission no matter how well it is sewn.
At hand-in the customer reacts in her own words — one screenshot line reads "Oh, how wonderful. This is MY dress, exactly as I wanted it." — and her name card shows a star rating. You also receive coin and reputation. The developers have never explained how the stars are calculated or published the full attribute list, so treat these numbers as examples of the system rather than a complete table.
Turning in the dress: coin, reputation and the shop window
Finished dresses are turned in for coin and reputation, and the customer's card shows a star rating for the dress you handed over. Coin buys fabric, so it fuels the next commission; reputation is your standing with the town, and the developers have not said exactly what it unlocks. What has never been published is the arithmetic: no coin table, no reputation thresholds, and no explanation of how the stars are worked out.
There is a second income. You can "display your own designs in your shop window and sell pre-made dresses off of the rack." Off-rack dresses answer nobody's brief but your own, and the developers put story commissions at roughly 35 hours while explicitly excluding them.
Common beginner mistakes
- Designing a dress you cannot afford to cut. Settle fabric in the sketchbook, not after the cut.
- Rushing the shears. Layout is the game.
- Ignoring print scale. A large motif disappears once it is cut into small panels.
- Cutting on the bias by accident. Bias is a deliberate look, not a way to make a piece fit.
- Over-decorating. Trim should finish a dress, not bury it.
- Hunting for a score. Coin and reputation are the feedback.
What to do next
For the wider picture — price, platforms, the free prototype — start on the dressmaker game homepage. Dressmaker sewing tips goes deeper on seam order and grain, customer preferences covers reading a brief and missing it on purpose, and the Dressmaker wiki is the reference tab for fabrics and accessories. To test the loop before spending anything, try the free itch.io prototype.